The Student Center provides students access to their university records and information. The Student Center also allows students to perform registration-related activities, such as preparing class schedules and accepting financial aid awards.
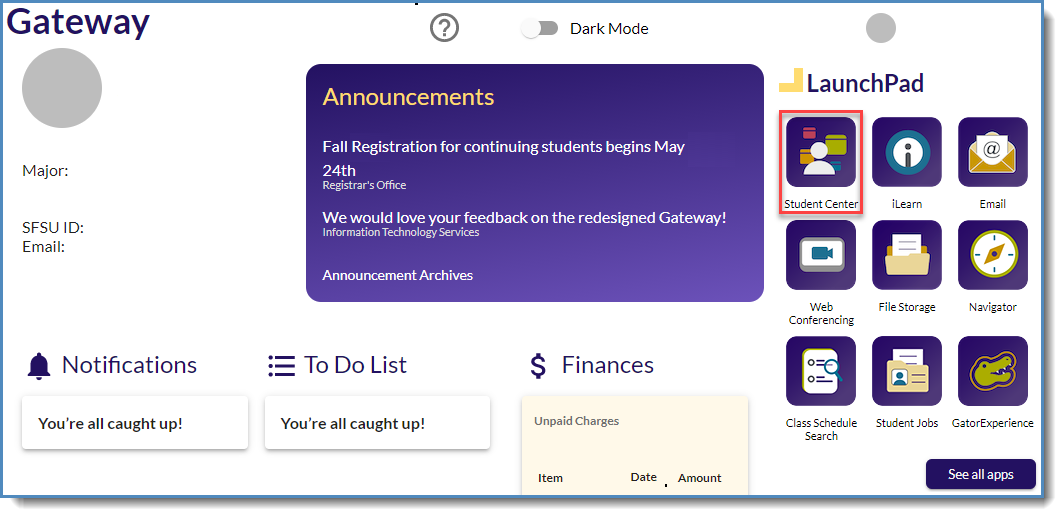
- Open SF State Gateway
- Navigate to the LaunchPad
- Select the Student Center tile
The Student Center is divided into different sections that provide important information related to a student's registration and records.
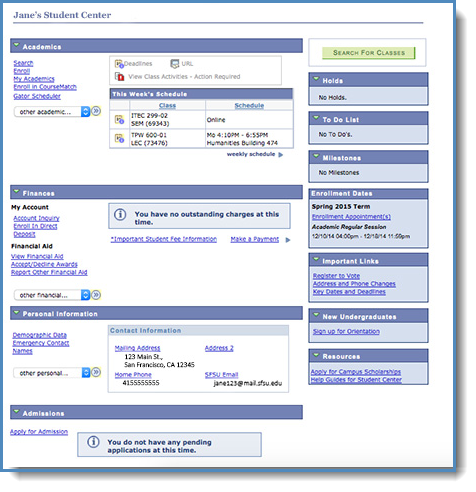
- Academics - Displays current semester schedule and provides links and drop-down box to view academic information and perform the academic activity
- Finances - Displays any outstanding charges and provides links and a drop-down box to view financial information and perform the financial activity
- Personal Information - Displays your current contact information and provides options to update
- Admissions - Displays pending admission status. Current students not applying to a graduate or credential program at SF State will see the message "You do not have any pending applications at this time."
- Holds - Displays holds that limit student activity. Holds need to be addressed immediately. Select "details" to see further information regarding a hold
- To-Do List - Displays items that must be completed. The hyperlink will display additional information and details to complete the To-Do list item
- Milestones - Displays benchmarks graduate students must meet outside of the degree requirements and tracks Math and English remediation statuses for some undergraduate students
- Enrollment Dates - Displays the date you can begin registering for classes
- Important Links - Provides useful website links for students to stay up-to-date with personal and campus activities
- New Undergraduates - Provides an orientation website link for new undergraduates
- Resources - Provides helpful and beneficial website links
The Student Center Academics section provides an overview of a student's current academic status. Here, students can quickly view their semester schedule, weekly class schedule, access academic information, and access other academic activity via the provided links and drop-down box.
Apply for Graduation
- Open the Student Center
- Open the other academic... menu
- Select Apply for Graduation
For more guides, important dates and deadlines, and policy please visit the Undergraduate Graduation home page.
Change Major
- Open the Student Center
- Open the other academic... menu
- Select the Change Major
For more guides, policies, and forms please visit the Online Change of Major and/or Minor home page.
Degree Progress Report (DPR)
- Open the Student Center
- Open the other academic... menu
- Select the Degree Progress Report
For more navigation guides, explanations, and solutions please visit the DPR home page.
Enrollment: Add, Drop, Edit, and Swap
On the Student Center, students have the ability to search, enroll, swap, and drop classes; as well as, change grading options for classes.
For explanations please visit the SF State Bulletin's Policies and Procedures site, and for text and videos Guides please visit the Registering for Classes page.
Request to Withdraw
On the Student Center, students have the ability to withdrawal from classes, withdrawing occurs when you request to remove yourself from classes AFTER the drop deadline. Please review the Dropping and Withdrawing page for policy guidance as well as things you should consider prior to requesting to withdraw.
For a guide please visit the Request to Withdraw section.
Withdrawal & Repeat Limits
All undergraduate students are subject to limits of Course Withdrawals and Course Repetitions. You can see the specific limits and monitor how your withdraws and course repetitions apply to them in your Student Center. Select Withdrawals/Repeats from the other academic drop-down menu for your detailed summary.
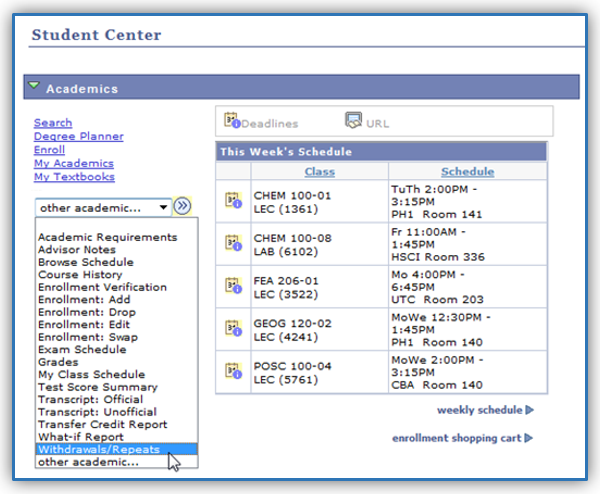
Select Withdrawals/Repeats from the drop-down menu and click on the (>>) button next to the field.
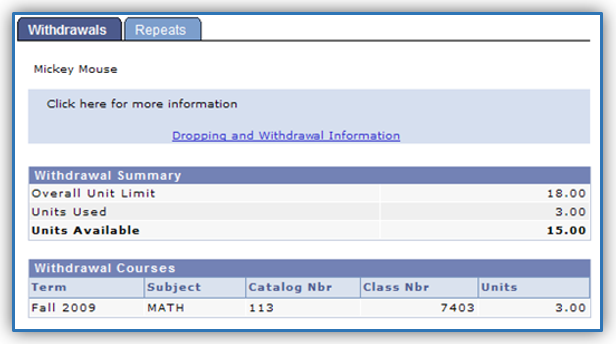
Viewing the Withdrawal Summary:
The summary default is the Withdrawals tab. This section displays the limit and the total number of withdrawn units counting towards it. To see which courses are being included, review the bottom section, “Withdrawal Courses.”
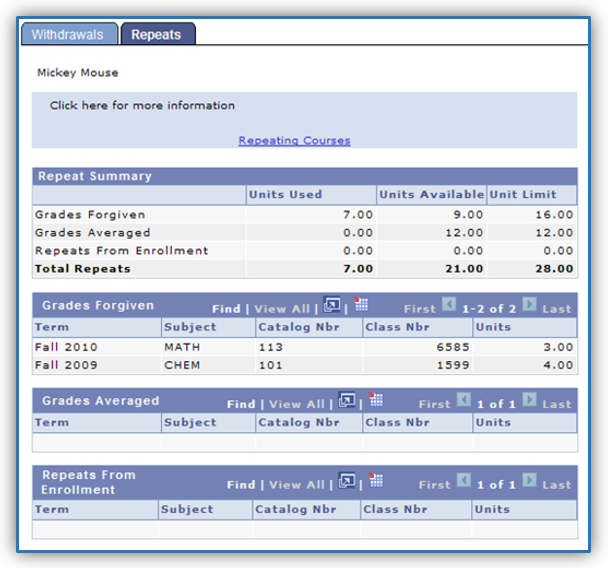
The Repeat Summary at the top consists of:
- Grades Forgiven (the grade in the initial attempt is not included in the GPA) displays total unit limit, units used, and units still available for grade forgiveness.
- Grades Averaged (the grades in all attempts are averaged into the GPA) displays total unit limit available, units used, and units still available for grade averaged.
- Repeats from Enrollment displays currently enrolled courses that may be subject to the repeat rules.
For detailed course information for each of the three categories of repeats, see the corresponding tables above. To view additional courses within the tables above, select View All.
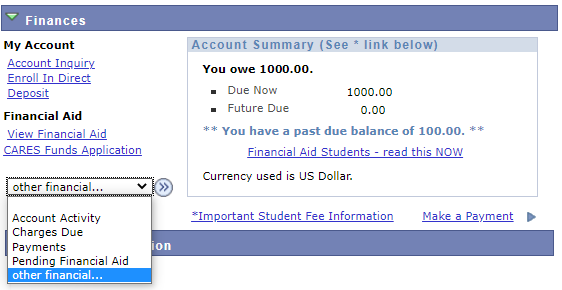
The Student Center Finances section provides an overview of a student's current financial status at SF State. Here, students can quickly view any outstanding charges, make payments, access financial information, and perform financial activity through the provided links and drop-down box. For explanations please visit the Bursar's Office site, and for tutorials please visit the Payments and Financial Aid page.
It is important to have current contact information on file with the university. Having an external (non-SFSU) e-mail address will allow students to use the online password reset tool to reset an SF State password. There are two types of contact information: personal, to contact you directly, and emergency, to contact others on your behalf if necessary.
Demographic Data
- Open the Student Center
- Navigate to the Personal Information section (bottom of Student Center)
- Click the Demographics Datalink
- There are seven tabs that provide the following personal information topics to add, edit, or delete:
- Addresses
- Names
- Phone Numbers
- Email Addresses
- Emergency Contacts
- Demographic Information
- Ethnicity
- Save changes
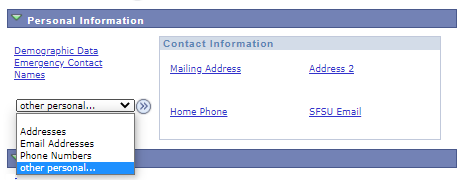
Note: The tabs can be viewed through any of the "other personal..." drop-down menu options (Addresses, Email Addresses, Phone Numbers).
Preferred Name
This can be something other than your legal name. For example, if your name is Rebecca, but you go by Becky, you can put that here.
- Open the Student Center
- Navigate to the Personal Information section (bottom of Student Center)
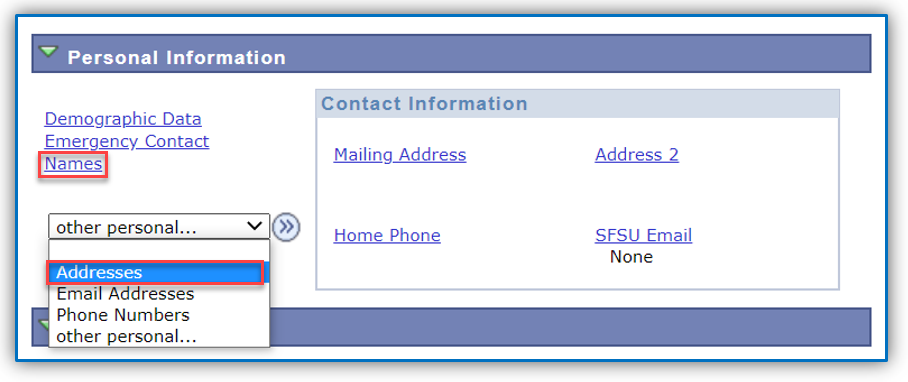
- Click the Names link
- If a preferred name exists, select Edit, otherwise select Add a New Name
- Select Preferred from the pull-down
- Edit the First and Last name fields (and any optional fields desired)
- Enter an effective date
- Click Save and Return to Current Name
NOTE: Changing your preferred name does not change your primary/legal name. To change your primary/legal name, complete the Name Change Request form and submit, with verification (Driver's License, California ID, passport, court documents), to the Registrar's Office (One-Stop Services Center, Student Services Building). Student employees must contact Human Resources (ADM 252) directly to have their HR records updated.
Diploma Name and Address
Put your name exactly as you wish it to appear on your diploma.
- Open the Student Center
- Navigate to your Personal Information section
- Select either the Names or Addresses links
- Edit, add, or verify your Diploma Name and Address
Emergency Contact Information
This is the information the campus needs if someone needs to be notified on your behalf.
- Open the Student Center
- Navigate to the Personal Information section (bottom of Student Center)
- Click the Emergency Contact link
- Edit, delete or add an emergency contact as necessary
- Save changes
Emergency Text Messages (Opt-in)
This is for when the campus sends emergency messages such as campus closures. If you choose to Opt-In, it is critical that you make sure your personal contact information is up-to-date.
- Open the Student Center
- Navigate to the Personal Information section (bottom of Student Center)
- Select an option from the Phone Numbers drop-down box: Addresses, Email Addresses, Phone Numbers
- Click the Go button (double arrow)
- Click on the "Add a Phone Number" button
- Select "Mobile Text" and enter your cell phone number to Opt-in
- Save changes